Page 42 - Rollingbearings
P. 42

A.2  Tolerances

                                                                                                        Table 4
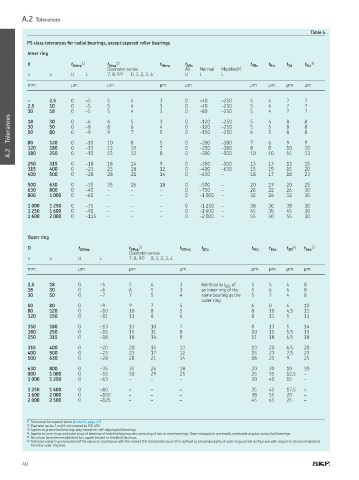
          P5 class tolerances for radial bearings, except tapered roller bearings

          Inner ring
          d              t ∆dmp 1)   t Vdsp 1)        t Vdmp  t ∆Bs                 t VBs  t Kia  t Sd  t Sia 3)
                                     Diameter series          All  Normal  Modiied 4)
          >      ≤       U   L       7, 8, 9 2)  0, 1, 2, 3, 4  U  L      L
          mm             µm          µm               µm      µm                    µm    µm    µm    µm

          –      2,5     0   –5      5      4         3       0    –40    –250      5     4     7     7
          2,5    10      0   –5      5      4         3       0    –40    –250      5     4     7     7
          10     18      0   –5      5      4         3       0    –80    –250      5     4     7     7
    Tolerances  18  30   0 0 0  –6   6 8 9  5 6 7     3 4 5   0 0 0  –120  –250     5 5 6  4 5 5  8 8 8  8 8 8
                             –8
                                                                   –120
                                                                          –250
          30
                 50
                 80
                             –9
          50
                                                                   –150
                                                                          –250
                                                                          –380
                 180
                             –13
          120
                                                                   –250
                                     13
    A.2   80     120     0 0 0  –10  10     8 10      5 7 8   0 0 0  –200  –380     7 8 10  6 8 10  9 10  9 10
                                            12
                                                                   –300
                             –15
                                     15
                                                                          –500
          180
                                                                                                11
                 250
                                                                                                      13
          250    315     0   –18     18     14        9       0    –350   –500      13    13    13    15
          315    400     0   –23     23     18        12      0    –400   –630      15    15    15    20
          400    500     0   –28     28     21        14      0    –450   –         18    17    18    23
          500    630     0   –35     35     26        18      0    –500   –         20    19    20    25
          630    800     0   –45     –      –         –       0    –750   –         26    22    26    30
          800    1 000   0   –60     –      –         –       0    –1 000  –        32    26    32    30
          1 000  1 250   0   –75     –      –         –       0    –1 250  –        38    30    38    30
          1 250  1 600   0   –90     –      –         –       0    –1 600  –        45    35    45    30
          1 600  2 000   0   –115    –      –         –       0    –2 000  –        55    40    55    30
          Outer ring
          D                t ∆Dmp           t VDsp 5)        t VDmp  t ∆Cs          t VCs  t Kea  t SD 6)  t Sea 3)
                                            Diameter series
          >      ≤         U      L         7, 8, 9 2)  0, 1, 2, 3, 4
          mm               µm               µm               µm                     µm    µm    µm    µm
          2,5    18        0      –5        5      4         3      Identical to t ∆Bs  of    5  5  4  8
          18     30        0      –6        6      5         3      an inner ring of the   5  6  4    8
          30     50        0      –7        7      5         4      same bearing as the   5  7  4     8
                                                                    outer ring
          50     80        0      –9        9      7         5                      6     8     4     10
          80     120       0      –10       10     8         5                      8     10    4,5   11
          120    150       0      –11       11     8         6                      8     11    5     13
          150    180       0      –13       13     10        7                      8     13    5     14
          180    250       0      –15       15     11        8                      10    15    5,5   15
          250    315       0      –18       18     14        9                      11    18    6,5   18
          315    400       0      –20       20     15        10                     13    20    6,5   20
          400    500       0      –23       23     17        12                     15    23    7,5   23
          500    630       0      –28       28     21        14                     18    25    9     25
          630    800       0      –35       35     26        18                     20    30    10    30
          800    1 000     0      –50       50     29        25                     25    35    12,5  –
          1 000  1 250     0      –63       –      –         –                      30    40    15    –
          1 250  1 600     0      –80       –      –         –                      35    45    17,5  –
          1 600  2 000     0      –100      –      –         –                      38    55    20    –
          2 000  2 500     0      –125      –      –         –                      45    65    25    –

          1)   Tolerances for tapered bores (table 11, page 47).
          2)  Diameter series 7 and 8 not covered by ISO 492.
          3)  Applies to groove ball bearings only, except for self-aligning ball bearings.
          4)  Applies to inner rings and outer rings of bearings of matched bearing sets consisting of two or more bearings. Does not apply to universally matchable angular contact ball bearings.
          5)  No values have been established for capped (sealed or shielded) bearings.
          6)  Tolerance values have become half the values in accordance with the revised ISO standard because SD is deined as perpendicularity of outer ring outside surface axis with respect to datum established
           from the outer ring face.
        40
   37   38   39   40   41   42   43   44   45   46   47