Page 207 - Rollingbearings
P. 207
Mounting and dismounting
           Measuring the clearance reduction  Measuring the lock nut tightening angle
           A feeler gauge is most often used to meas-  This method can be used when mounting
           ure the radial internal clearance in    bearings with a bore diameter d ≤ 120 mm
           medium-size and large spherical and CARB   Recommended values for the tightening
           toroidal roller bearings  Recommended val-  angle α are listed in the relevant product
           ues for the reduction of radial internal clear-  section
           ance to obtain the correct interference it are   Before starting the inal tightening proced-
           listed in the relevant product section   ure, push the bearing up onto the tapered
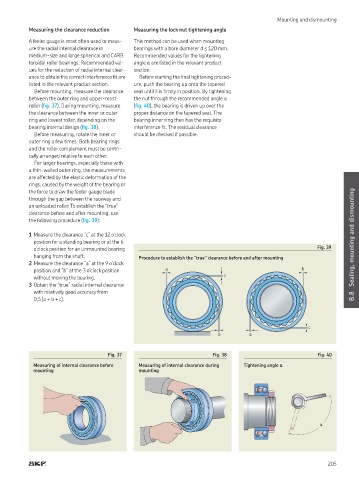
            Before mounting, measure the clearance   seat until it is irmly in position  By tightening
           between the outer ring and upper-most   the nut through the recommended angle α
           roller (ig. 37)  During mounting, measure   (ig. 40), the bearing is driven up over the
           the clearance between the inner or outer   proper distance on the tapered seat  The
           ring and lowest roller, depending on the   bearing inner ring then has the requisite
           bearing internal design (ig. 38)    interference it  The residual clearance
            Before measuring, rotate the inner or   should be checked if possible
           outer ring a few times  Both bearing rings
           and the roller complement must be centri-
           cally arranged relative to each other
            For larger bearings, especially those with
           a thin-walled outer ring, the measurements
           are affected by the elastic deformation of the
           rings, caused by the weight of the bearing or
           the force to draw the feeler gauge blade
           through the gap between the raceway and
           an unloaded roller  To establish the “true”
           clearance before and after mounting, use
           the following procedure (ig. 39):

           1 Measure the clearance “c” at the 12 o’clock                                                              Sealing, mounting and dismounting
            position for a standing bearing or at the 6
            o’clock position for an unmounted bearing                                                     Fig. 39
            hanging from the shaft             Procedure to establish the “true” clearance before and after mounting
           2 Measure the clearance “a” at the 9 o’clock
            position and “b” at the 3 o’clock position   a                                           b
            without moving the bearing                                     c
           3 Obtain the “true” radial internal clearance
            with relatively good accuracy from
            0,5 (a + b + c).                                                                                          B.8


                                                                                                       c
                                                                         b          a


                                     Fig. 37                            Fig. 38                           Fig. 40
            Measuring of internal clearance before   Measuring of internal clearance during   Tightening angle α
            mounting                           mounting


                                                                                                           α


                                                                                                              205

