Page 149 - Rollingbearings
P. 149
Surface texture of bearing seats
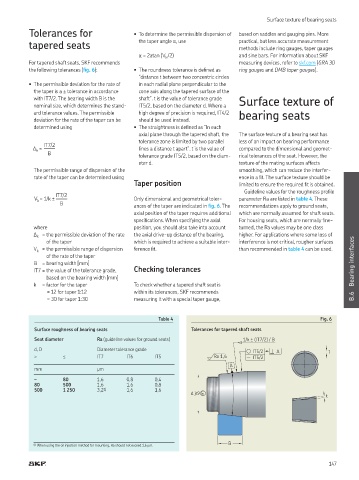
Tolerances for • To determine the permissible dispersion of based on saddles and gauging pins. More
tapered seats the taper angle α, use practical, but less accurate measurement
methods include ring gauges, taper gauges
α = 2atan (V /2) and sine bars. For information about SKF
k
For tapered shaft seats, SKF recommends measuring devices, refer to skf.com (GRA 30
the following tolerances (ig. 6): • The roundness tolerance is deined as ring gauges and DMB taper gauges).
“distance t between two concentric circles
• The permissible deviation for the rate of in each radial plane perpendicular to the
the taper is a ± tolerance in accordance cone axis along the tapered surface of the
with IT7/2 The bearing width B is the shaft”. t is the value of tolerance grade Surface texture of
nominal size, which determines the stand IT5/2, based on the diameter d. Where a
ard tolerance values The permissible high degree of precision is required, IT4/2 bearing seats
deviation for the rate of the taper can be should be used instead.
determined using • The straightness is deined as “In each
axial plane through the tapered shaft, the The surface texture of a bearing seat has
tolerance zone is limited by two parallel less of an impact on bearing performance
IT7/2
k lines a distance t apart”. t is the value of compared to the dimensional and geomet
B tolerance grade IT5/2, based on the diam rical tolerances of the seat. However, the
∆ =
eter d. texture of the mating surfaces affects
The permissible range of dispersion of the smoothing, which can reduce the interfer
rate of the taper can be determined using ence in a it. The surface texture should be
Taper position limited to ensure the required it is obtained.
Guideline values for the roughness proile
IT7/2
k Only dimensional and geometrical toler parameter Ra are listed in table 4. These
B ances of the taper are indicated in ig. 6. The recommendations apply to ground seats,
V = 1/k ±
axial position of the taper requires additional which are normally assumed for shaft seats.
speciications. When specifying the axial For housing seats, which are normally ine
where position, you should also take into account turned, the Ra values may be one class
Δ = the permissible deviation of the rate the axial driveup distance of the bearing, higher. For applications where some loss of
k
of the taper which is required to achieve a suitable inter interference is not critical, rougher surfaces
V = the permissible range of dispersion ference it. than recommended in table 4 can be used.
k
of the rate of the taper
B = bearing width [mm] Bearing interfaces
IT7 = the value of the tolerance grade, Checking tolerances
based on the bearing width [mm]
k = factor for the taper To check whether a tapered shaft seat is
= 12 for taper 1:12 within its tolerances, SKF recommends
= 30 for taper 1:30 measuring it with a special taper gauge, B.6
Table 4 Fig. 6
Surface roughness of bearing seats Tolerances for tapered shaft seats
Seat diameter Ra (guideline values for ground seats) 1/k ± (IT7/2) / B
d, D Diameter tolerance grade IT5/2 A t
> ≤ IT7 IT6 IT5 Ra 1,6 IT5/2
A
mm μm
– 80 1,6 0,8 0,4
80 500 1,6 1,6 0,8
500 1 250 3,2 1) 1,6 1,6
d js9 E
t
B
1) When using the oil injection method for mounting, Ra should not exceed 1,6 μm.
147

